
This week we are going to make a couple things as one project. This simple crochet pattern is just three granny squares pieced together a couple times (different sizes) with a crochet strap to round out the project. Although these do not have to look identical, like the ones I did for myself and my little one, it does help with the theme of Mommy and Me. if you’re like me, there’s a little one around who wants to be with you all the time, and copy everything you do, so why not celebrate this brief time by creating something for the two of you to enjoy together?
This pattern is pretty simple, the main pattern will be for the smaller version, with the adult version in parenthesis. There is also a video available at the end of this pattern so you can see how I go through each step in case that is more helpful!
Because these are essentially Granny Squares, this is a great yarn stash project. In the end I chose to go with four different colors, but this pattern would also look really cute with the varying colors and combinations of rows as well. If you have lots of yarn lying around that isn’t enough for a full project, this is a great place to put them to use!
For this pattern we will need the following:
- Worcested weight yarn. Any color will do, just make sure the yarn is all relatively the same type (not regular acrylic with wool, or some fluffy kind of yarn).
- Crochet Hook “I” (5.25mm)
- Scissors
- Tapestry Needle
Once we have all our materials, let’s get started!
- Chain (ch) 4, join with a slip stitch (sl st). This is called a Magic Circle.
- Ch 3, then double crochet (dc) 11 times into the center of the ring we created in the last step. Join with a sl st, ch 3.
- 2 dc into the space between the post and 1st dc from the previous row. Skip next three dc posts, and 3 dc into the space between the dc posts from the previous row, ch 1, then 3 more dc into the same space. Skip next three posts and repeat (3 dc, ch1, 3 dc) twice more, joining row together with a sl st. Your circle should now look like a square. Ch 3.
- Before chaining 3 at the end, bring yarn under the sl st section and create a single crochet, then ch 2. This will give the chain post the same look as the other double crochet posts, and make it easier to start the next rows.
- 2 dc in between dc cluster from previous row. (3 dc, ch 1, 3 dc) into the next space. 3 dc into next space, then (3 dc, ch 1, 3 dc) into the next space. Note how the end of a line on the square (the corner section) will have two rounds of 3dc clusters in it, separated by a ch 1 to help shape the corners. The spaces in the middle of the “rows” will only have one 3 dc cluster in it because it is forming the sides.
- This is where my bags would change colors. To do so, cut the yarn, leaving enough of a tail to weave in later, then bring in the new color, grabbing it with the hook and pulling through the chain on our hook, and chain 2. Once the chain is established, I tie the ends together to a) keep the tension correct for my new color, and b) to make sure my previous row doesn’t become loose or unravel.
- The remaining rows will all be a variation of the 4th direction. Each new row will increase the number of middle clusters (the sides) by 1. This keeps the square growing with each new row. Feel free to change colors when you would like.
- The Mini bag will end up with 6 rows (the Adult bag will have 9).
- Repeat all steps until you have 3 granny squares of each size.
- Once you have them all, weave in the ends now so they won’t be in your way when you join the squares together.
- Bring two of the squares together, then join together with single crochet (sc) stitches across all stitches. If you keep your fingers in the spaces between the clusters it will help keep the squares lined up while stitching.
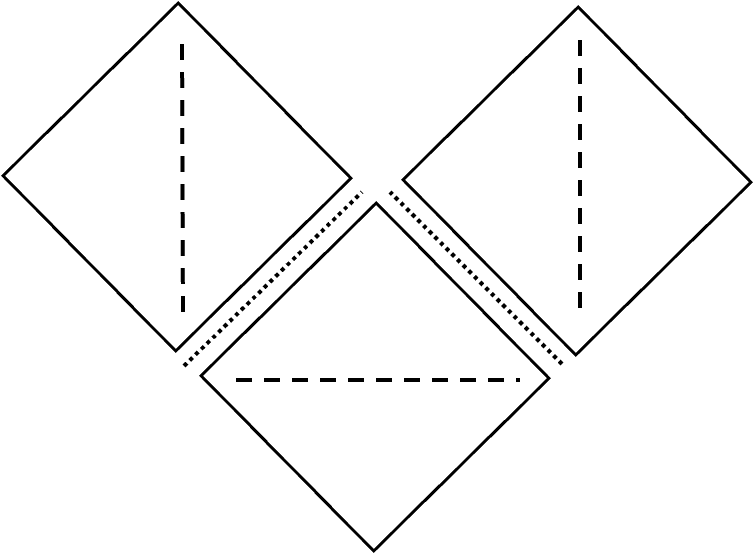
- Continue along the next side, then bring in the third square to do the same thing. There’s a diagram below to help figure out where to stitch together. If you arrange the squares like below you can see where the bag will be stitched together (smaller dotted lines). The dashed lines in the center of the squares is how it will fold to create the bag look.
- From there, crochet the strap by using the top of the corner, and going between the posts for stability, and using half double crochet (hdc) fo each row. The mini bag will have 4 stitches across, and continue for 29 rows then join with the other side (6 across for Adult bag, and 59 rows).
I hope that was easy follow, let me know if you have any follow up questions, otherwise the video below goes through all those steps as well! Enjoy!

Leave a comment